This is actually so simple that I’m kinda embarrassed to talk about it. On the other hand, the digital generation doesn’t seem to know about this fact. We often see digital photos poorly underexposed, sometimes because the camera metering was fooled by some bright source of light, other times because it was impossible to get proper light conditions, or even because we mistakenly set up the camera wrong. In the old days, in order to save a frame like this, we’d go to the darkroom and use a film developing technique called “push processing”. This means developing the film for more time, over the recommended by the manufacturer, in order to compensate the underexposure in the camera by increasing the effective sensitivity of the film. In other words, you could have had an underexposed shot in an ISO 100 film and push it up to 2 steps to ISO 400, for instance.
I remember reading an article by the late Galen Rowell, one of my favorite photographers ever, on Outdoor Photographer magazine about this a long time ago, and that brought up an idea to me: it’s better to just take the shot than not taking it for not having the proper gear to do it. If the light is bad and you don’t have a flash to properly fill the image, or a fast lens, or whatever, you can always try to save the frame later by properly developing the film. By that time, you had to rely on a good lab to do so. Nowadays, it’s much easier thanks to digital photography and software.
First of all, this technique will only work on RAW images — JPEG images don’t have enough information in the file in order to support this procedure. In the digital world, what was once a painful and time-consuming procedure is now reduced to a mouse click. Just open the photo in your RAW editor (for Nikon, I recommend Nikon ViewNX 2; for Canon, use Adobe Camera RAW, which seems to give a better conversion than DPP) and increase the exposure slide. I don’t recommend pushing a RAW file beyond 2 steps, since chromatic aberration is likely to appear next to blown highlights. Here is an example:
This image was taken using a 28-70mm f/2.8 lens at 70mm, f/2.8. It’s underexposed at 1/125 and ISO 200. Then, I pushed up 1 step to ISO 400 in Nikon ViewNX 2:

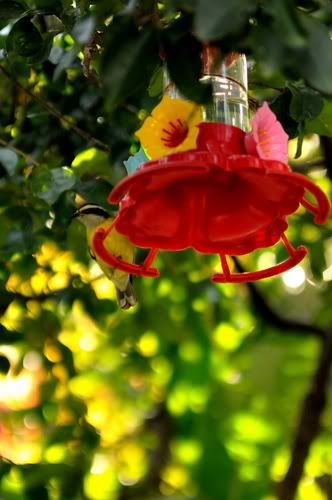
The result is a much clearer and vivid image. Sharpness suffers a bit and it would have been better if I had used a flash to properly fill the foreground. But pushing it up by 1 step is enough to save the shot. By contrast, here is one properly flash-filled shot taken in the same day:

This was taken using the same 28-70mm f/2.8 lens at 70mm, f/4, 1/200, ISO 200. Metering was done on the background, so the Nikon SB-400 flash was adjusted for +1EV compensation. You can see that the picture is much sharper, partly because a smaller aperture was used (f/4 vs. f/2.8), but mostly because the flash froze the frame.
So, you can see that push processing RAW is not that bad and can really save the day if you were unlucky. This is the main reason why I don’t shoot JPEG anymore — the other is that I can easily fine tune white balance in ViewNX 2 in case I get it wrong or don’t have a proper grey point preset saved in my camera.
Note to “purists”: if you think this is cheating, bear in mind that the JPEG out of your modern digital camera has way more processing than any frame meticulously developed by Ansel Adams in the old days. Think about it. 😉
* Note: all the images used in this article are actually SOOC, apart from the purposely +1EV uprating in the second photo.