Last month I nearly finished assembling my guitar pedalboard after nearly 15 years of planning. True, the plan changed a bit throughout the years, but the core of it was untouched. I needed versatility and tone quality in a somewhat compact board, and it seems I made it. Now I will share with you the rationale behind my decisions: what pedals to get and how to order them in the signal path. In other words, how to assemble a guitar pedalboard, using my particular case as an example. At the end of the article, I will summarize all the ideas and rules for pedalboard order in a small list.
How to assemble a guitar pedalboard — Table of contents
- Starting with the basics
- Improving from the starting point
- Getting to your dream tone
- Rules for pedalboard signal chain order
How to assemble a guitar pedalboard: starting with the basics
The first thing that came to my mind when I started building my pedalboard was to keep the pedal list short, for two reasons:
- Too many pedals mean too much signal degradation between the guitar and the amp;
- Too many pedals cost too much money.
That meant that I would have to carefully choose the effects I was going to use. In the early days, I played mostly classic rock and metal, so I focused on distortion and wah. My initial plan was to have a distortion box, an equalizer for the metal tunes and a wah for solos. So I started with a Boss DS-1, Boss GE-7 and a Dunlop GCB-95 Crybaby wah-wah.
The Boss DS-1 was my choice for distortion because it was affordable (I was a teenager and didn’t have much money to spend on gear). It sucks on its own, but with the Boss GE-7, I could reshape the distortion to match my needs. And the Dunlop Crybaby wah-wah was preferred over the Vox because I needed a higher-pitched tone for those Kirk Hammett crazy wah parts. Signal path was trivial:
wah-wah → distortion → EQ
Regarding pedal order on the pedalboard signal path, filters always come first, unless you are using the wah in series with a Fuzz Face (or any other germanium transistor-powered fuzz pedal), which sounds weird when used in series after a wah. Then distortion and EQ after it, so it can shape the distorted tone.
How to assemble a guitar pedalboard: improving from the starting point
Eventually, I got fed up with the Boss DS-1 and replaced it by my Fender amp’s preamp tube distortion and ran the Boss GE-7 in the FX loop. That Boss DS-1 was sold and this was the worst decision in my guitar pedalboard plans (you will see why later).
By that time, my tone ideas were more mature and I came up with the project which resulted in the current pedalboard. The core idea remained the same as before: keep things as simple as possible to avoid signal degradation and budget creeping. The effects list was:
- Wah-wah
- Two distortion/drive boxes (one for boost, other for the actual distortion)
- Delay
- Volume
The equalizer ended up staying at the board because of eventual use in metal tunes. As usual, EQ goes after the distortion, so it can shape the distorted tone.
I was using two volume pedals at the time, one before the distortion section, and one after it. The first controlled the signal from the guitar, so it adjusted the distortion level, while the second was used for proper volume control and swell effects.
The delay was the last pedal of the chain, so if I used the second volume, the echoes didn’t cut out. My choices of distortion were the tube preamp distortion from the amp, plus an Ibanez TS-9 Tubescreamer as a boost. The delay was a Danelectro DE-1 Dan Echo unit, which is the best sounding delay pedal I have ever used.

My pedalboard, early 2000s
The signal path was:
volume 1 → wah-wah → overdrive → distortion → amp — FX loop send → EQ → volume 2 → delay → FX loop return
This setup lasted for many years, I think from 2000 to 2007. Then I started giving more emphasis to the clean channel, and the chorus and compressor were added to the plan. I also excluded the first volume pedal from the chain, since I could stop being lazy and controlling the distortion levels using the guitar volume knob. I also realised that using Radio Shack daisy chain power adapters was not optimal for sound quality, so I invested in a proper modular power supply unit as well.
That resulted on the guitar pedalboard I showed here in October 2011. In between, I went to engineering school and got into modifying pedals. So I got a new Boss DS-1 and modded it to the Robert Keeley DS-1 Ultra Mod specs, making it the ultimate Marshall-tone-in-a-box pedal. I also modified my Ibanez TS-9 circuit to be like the TS-808’s, and then applied the Robert Keeley TS-808 Mod for enhanced bass response, better gain and true bypass. And last, I modified my Dunlop GCB-95 for true bypass and adjusted the tonal range to sound more like the Vox wah.

My pedalboard, October 2011
As for the compressor and chorus, I ended up choosing a Marshall ED-1 compressor, for its versatility, and a t.c. electronic Corona Chorus, for its tone similarity with the t.c. electronic Stereo Chorus/Flanger, plus the ability of adding new tones via TonePrint.
The resulting signal path was:
wah-wah → compressor → overdrive → distortion → EQ → volume → delay
Notice that the tuner is not in the signal path, but connected to the tuner output of the volume pedal.
How to assemble a guitar pedalboard: getting to your dream tone
Lately I have been developing a certain thing for fuzz pedals. So, I decided to add one as my third distortion box. After testing some pedals, I came up across Robert Keeley’s Fuzz Head and that became my fuzz of choice. It isn’t as temperamental as the Dallas Arbiter Fuzz Face, nor it requires a huge guitar pedalboard to house it. Plus, it allows me to switch between silicon and germanium transistors, giving me a lot of tone options.
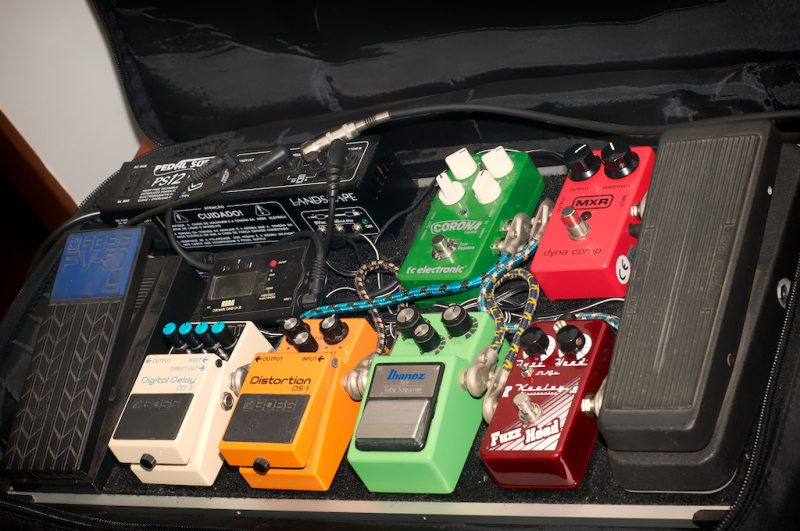
In the end, I also replaced the delay and compressor pedals. The Danelectro DE-1 sounds great, but it didn’t allow me to control exactly the delay times, so I replaced it with a Boss DD-3. I might modify it in the future to the Robert Keeley DD-3 specs, in order to add the analog delay tone options. As for the compressor, I exchanged the versatility of the Marshall ED-1 for the simplicity of the classic MXR dyna comp. Only the tuner remains to be replaced (my little Korg is dying).
Let’s take a look at the final signal chain now:
Dunlop Crybaby Mod → MXR Dyna Comp → Keeley Fuzz Head → Ibanez TS-9 Mod → Boss DS-1 Mod → t.c. electronic Chorus → Boss Volume → Boss DD-3
How to assemble a guitar pedalboard: “rules” for pedalboard signal chain order
My rules of thumb for pedal order in the signal path are:
- Wah-wah (or any other filter) comes first, since the effect of it over the raw signal is more predictable. The exception would be when using it in series with a Fuzz Face (or any germanium transistor powered fuzz), since it screws up the tone. In my case, I switch the transistors from germanium to silicon in the Fuzz Head when using it with the wah and all is good. Sure, there’s a tonal change, but it’s better than moving pedals or cables around.
- Compressor sounds typically better before the distortion, since it tends to amplify noise from the dirty boxes if placed after them.
- The order of your distortion pedals depends on how you are using them. In my setup, the Boss DS-1 acts as a preamp due to the Ultra Mod. So any distortion will usually come from it and I’ll use the Ibanez TS-9 as a boost. The fuzz is typically used to get those Hendrix-like fuzz tones, but it can also be used as a clean boost (silicon transistors selected, max volume, zero fuzz), so that will come first. If I need vintage overdrive tones, I can leave the Boss DS-1 with very little drive, just enough to produce a light crunch, and then use the Ibanez TS-9 as an overdrive and the Keeley Fuzz Head as a boost. The possibilities here are infinite. The only thing you need to keep in mind when using 3 dirty boxes is that the signal will become very noisy if you can’t properly control the distortion levels. Try to keep the signal dirty enough to produce tone only, not artificial gain/sustain.
- Modulation comes after the distortion. Before the distortion, modulation effects sound weird, since the modulated clean signal will be clipped by the distortion pedals. So that’s why I keep the chorus after the distortion section.
- Volume comes between modulation and delay, and after the distortion. Before the delay because if I cut the volume, the echoes don’t cut out; and after the distortion so I can get volume swell effects. Volume pedals before the distortion are used to control the distortion level, but that can also be done via the guitar volume knob. My volume pedal also has a separate out for the tuner. Tuners kill tone, so it’s wise to keep them out of the signal path.
- Delay is the last effect in my chain, due to the volume pedal issue I just mentioned.
Of course, you may want to experiment with your own pedals, as the order of effects in the chain changes the tone dramatically. The rules above work for me and are a good starting point for newbies who don’t know how to use guitar pedals, but you are encouraged to experiment and have fun in this process.
The only change I might make in the future is to introduce some A/B boxes if I decide to go for the dual amp route. But that’s a topic for another post. I hope you enjoyed my approach on how to assemble a guitar pedalboard. Keep on rockin’!